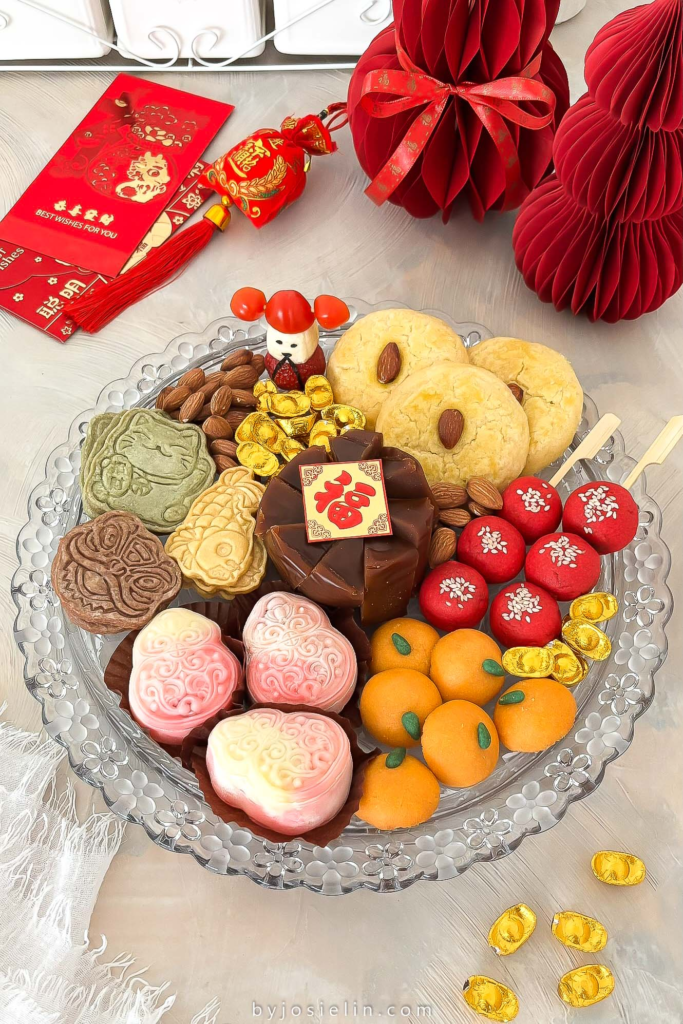
So excited to share my very first Chinese New Year dessert platter! It’s packed with festive treats and arranged like a charcuterie-style cheese board, featuring nian gao, buttery shortbread, snow skin mooncakes, mandarin orange cookies, tanghulu-inspired cookies, Chinese almond cookies, a cute Caishen 财神爷 (God of Wealth), gold chocolate money, and roasted almonds. 新年快乐!

Finally found the time to sit down and write about this CNY dessert platter! I did so much baking this new year, my kitchen was basically in nonstop production mode, but with so many ideas and so little time to edit photos and actually write about them… hehe. Better late than never, right??
Chinese New Year (Spring Festival)
is the most important holiday in our culture. Growing up, my family would always serve traditional sweets like nian gao, fa gao, or thousand layer cake to symbolize prosperity and good fortune. But this year, I wanted to do something a little different. I’ve been thinking about creating a charcuterie-style dessert platter inspired by a cheese board. Something festive, filled with Chinese-inspired desserts, and fun for sharing. And I finally made it happen!
This platter is packed with festive treats and styled just like a cheese board. There’s nian gao sliced like a cheese wheel, buttery shortbread cookies, soft and chewy snow skin mooncakes, adorable mandarin orange cookies, tanghulu-inspired cookies, and those classic almond cookies you’ll often find at Chinese restaurants. I also added a cute little Caishen 财神爷 (God of Wealth), gold chocolate money, and roasted almonds.
I know it’s too late to convince you to make this for this year, but save this idea for next Chinese New Year, okay? Or maybe for the Lantern Festival, the 15th and final day of the New Year celebration! Hehe. Here are all the details and recipes for everything on the platter:
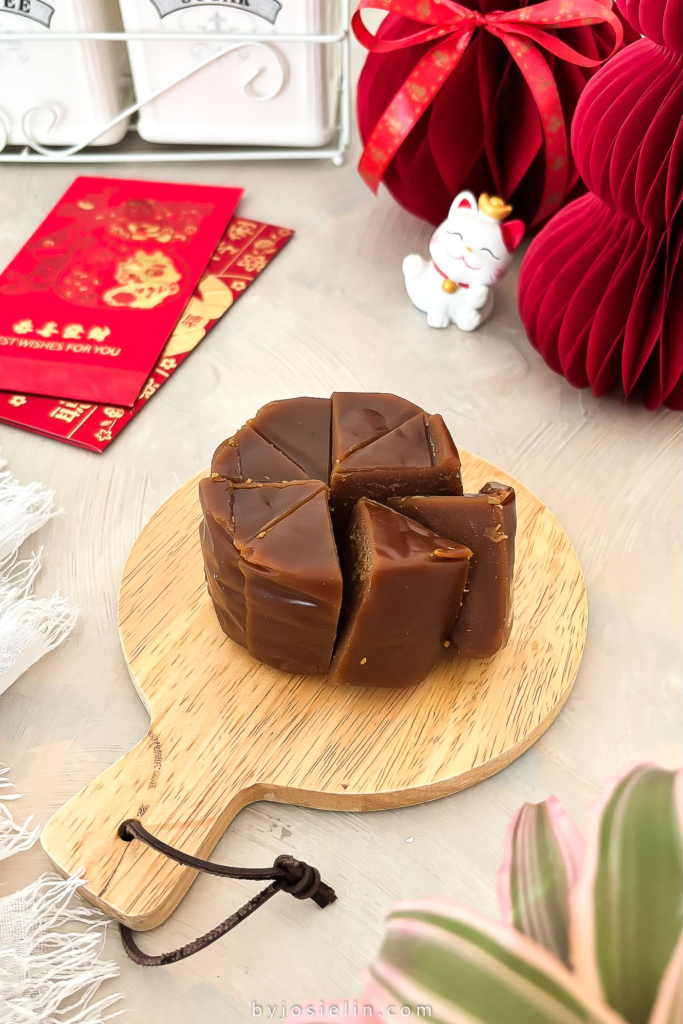
NIAN GAO
Nian gao is a traditional sticky rice cake commonly enjoyed during Chinese New Year, symbolizing growth, prosperity, and good fortune for the year ahead. I used store-bought nian gao, then sliced and arranged it like cheese on a board to give this traditional dessert a fun, charcuterie-style presentation.
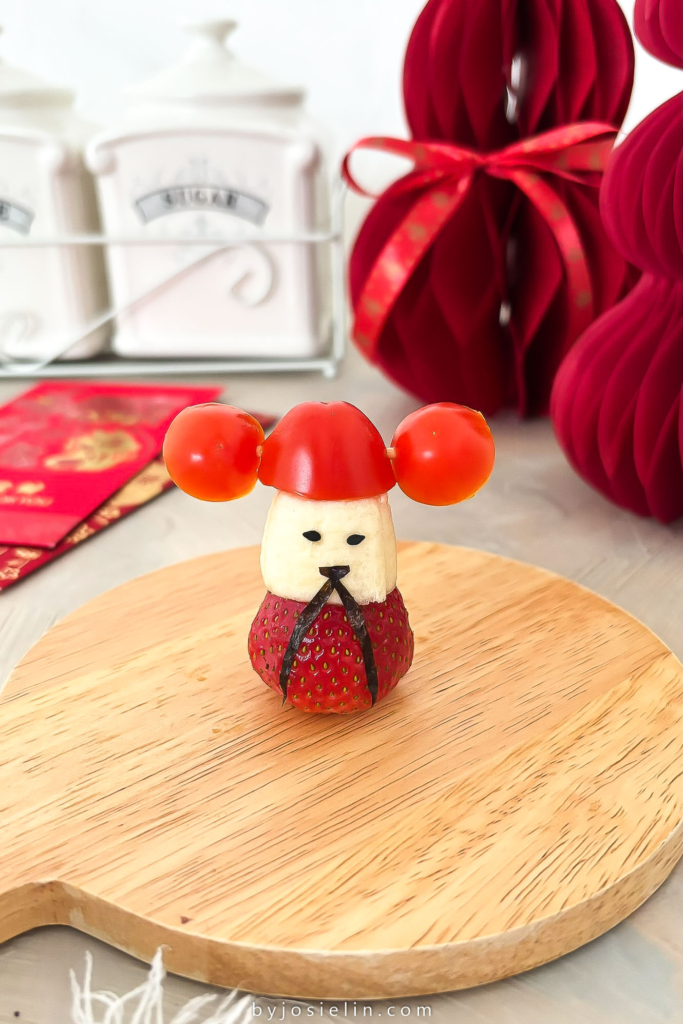
CAISHEN 财神爷 (GOD OF WEALTH)
This cute Caishen went viral on Chinese social media, and of course I had to make one! Made with strawberries for the body, a slice of banana for the head, and cherry tomatoes for the hat. I used black sesame seeds for the eyes and dried seaweed for the mouth and beard. So cute, right? Hehe.
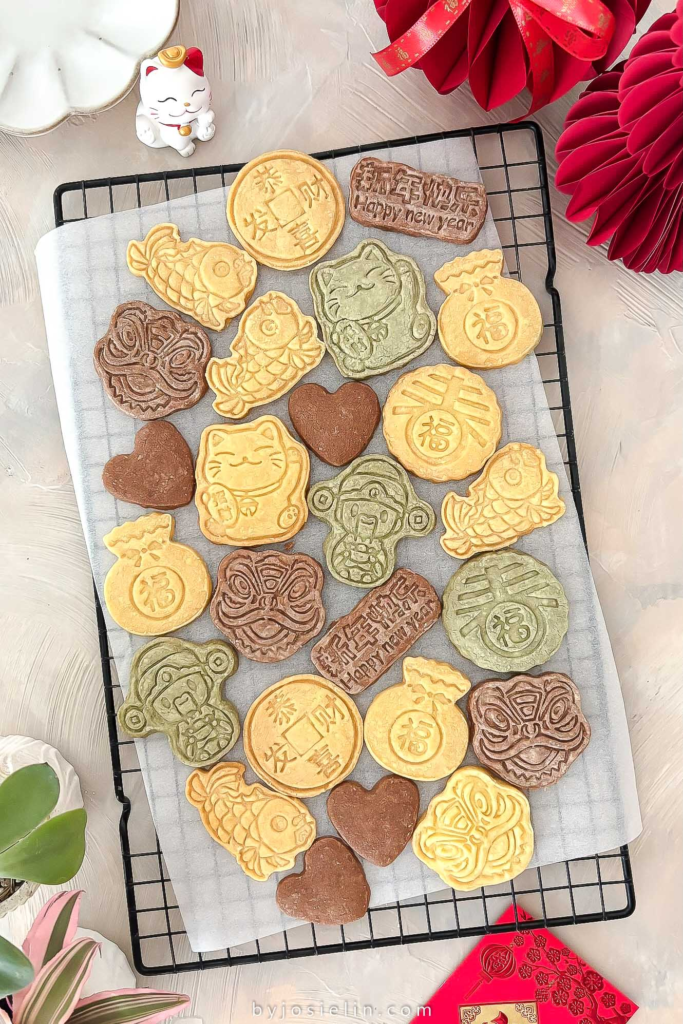
SHORTBREAD COOKIES
These chocolate, matcha, and pumpkin shortbread cookies are absolutely divine. They’re rich, buttery, perfectly crumbly, and made with natural flavors from real powdered ingredients. Every bite just melts in your mouth. And they don’t spread in the oven at all, which means your cookie cutter stamps come out clean, sharp, and totally picture-perfect.
Ingredients:
- 113g (1 stick) unsalted butter, soft at room temperature
- 62g (1/2 cup) powdered sugar
- 1/2 teaspoon vanilla extract
- 125g (1 cup, spoon and level method) all-purpose flour
- 1 tablespoon cornstarch
- 2 teaspoons cocoa powder or matcha powder or pumpkin powder
- a pinch of salt
Here’s How to Make It:
Line 2–3 baking sheets with parchment paper or silicone baking mats and set aside. In a small bowl, whisk together the flour, cornstarch, powdered flavor of choice, and salt. Set aside.
In a large mixing bowl, beat the unsalted butter, powdered sugar, and vanilla extract until smooth and creamy. Gradually add the dry ingredients to the butter mixture, mixing just until a soft dough forms. Be careful not to overmix, as this can make the cookies tough. If the dough still sticky, add more cornstarch, one teaspoon at a time.
Turn the dough out onto a sheet of parchment paper. Lightly flour your hands and gently pat it into a rough rectangle. Place a second sheet of parchment paper on top and roll the dough to about ¼-inch thickness.
Remove the top sheet and use your favorite cookie cutters or stamps to cut out shapes. Lightly dust the cookie cutters and dough with cornstarch to prevent sticking. Transfer the cutouts to the prepared baking sheets, spacing them slightly apart. Gather the scraps, re-roll, and continue cutting until all the dough is used.
Place the baking sheets in the freezer for about 15 minutes to help the cookies hold their shape. While the cookies are chilling, preheat the oven to 350°F (175°C).
Bake for about 15 minutes, or until the edges are lightly golden. Let the cookies cool on the baking sheets for 10 minutes before transferring them to a wire rack to cool completely. Repeat with the remaining trays as needed.
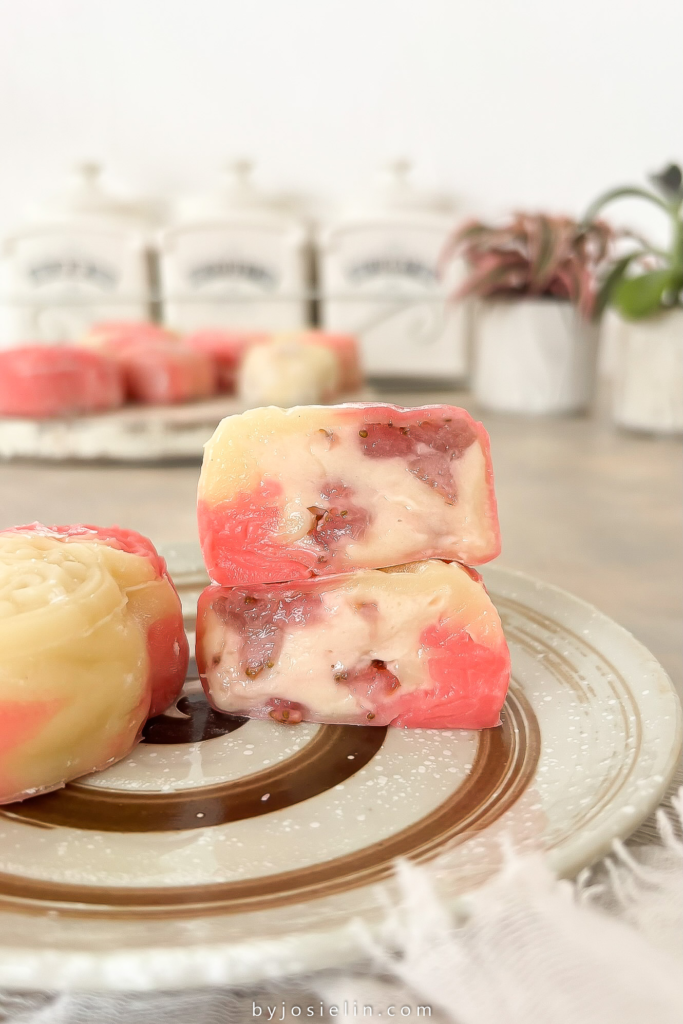
SNOW SKIN MOONCAKES
These Strawberry Cheesecake Snow Skin Mooncakes (冰皮月饼) are my favorite modern Chinese dessert! A soft, chewy glutinous rice flour skin wraps around the creamiest strawberry cheesecake filling. They’re so much fun to make, and yes, they taste just as good as they look!
Strawberry Jam:
- 160g (1 heaping cup) diced strawberries
- 2 tablespoons granulated sugar
- 1 tablespoon fresh lemon juice
- 1/2 teaspoon fresh lemon zest
- 1/8 teaspoons cornstarch
Cream Cheese:
- 340g (12 oz) original cream cheese, room temperature
- 60g (1/2 cup) powdered sugar
- Strawberry jam
Snow Skin:
- 80g (2/3 cup) glutinous rice flour
- 30g (1/4 cup) rice flour
- 30g (1/4 cup) cornstarch
- 60g (1/2 cup) powdered sugar
- 180g (3/4 cup) whole milk
- 2 tablespoons neutral oil
- 1/2 teaspoon vanilla extract
- a little pinch of salt
- 1 tablespoon unsalted butter, room temperature
STEP 1 – Make the Strawberry Cheesecake Filling
In a small saucepan, combine the diced strawberries, granulated sugar, lemon juice, lemon zest, and cornstarch. Cook over medium-low heat, stirring frequently, until the strawberries have softened and the mixture has thickened, about 4–5 minutes. Remove from the heat and let cool completely.
In a medium bowl, beat the room-temperature cream cheese and powdered sugar with an electric mixer until smooth, creamy, and fully combined.
Using a rubber spatula, gently fold in the cooled strawberry mixture, draining off any excess liquid first to prevent the filling from becoming too soft. Cover tightly with plastic wrap and refrigerate for at least 2 hours, or until firm enough to scoop and shape.
STEP 2 – Make the Snow Skin
Fill your steamer with enough water, bring it to a boil over medium heat, and let the empty steamer heat for about 15 minutes.
In a medium mixing bowl, whisk together the glutinous rice flour, rice flour, cornstarch, powdered sugar, and salt. In a large measuring cup or another mixing bowl, combine the whole milk, oil, and the vanilla extract. Whisk until smooth.
Gradually pour the wet ingredients into the dry while whisking. Mix until fully incorporated and no lumps remain. Strain the batter through a fine-mesh sieve into a heatproof bowl that fits inside your steamer to remove any clumps.
Steam the batter over medium-high heat for 15–20 minutes, until set. It’s ready when a butter knife inserted into the center comes out clean and the dough feels firm. Remove the bowl from the steamer and let it cool for about 10 minutes.
When the dough is warm to the touch, add 1 tablespoon of unsalted butter and knead until smooth and stretchy, about 5 minutes. Shape the dough into a ball, wrap in plastic wrap, and let it cool completely. (wear food-safe gloves to prevent sticking.)
STEP 3 – Assemble the Mooncakes
I use a 1:1 ratio of skin to filling with a 50g (2-inch) plastic mooncake mold, so 25g filling and 25g snow skin.
Once the strawberry cheesecake filling has set, divide it into 15 portions (about 25g each). Roll each portion into a ball, cover with plastic wrap, and let them rest in the fridge until ready to assemble the mooncakes.
Divide the cooled snow skin dough and knead in your desired food coloring. I split mine into two portions and dyed one with light pink gel food coloring. Roll each portion into a long log, then twist them together into one. Divide into 15 portions (about 25g each) and shape into balls.
Lightly coat a ball of snow skin with cornstarch, then roll it out into a circle with a rolling pin. Place a strawberry cheesecake ball in the center and gently pull the snow skin over to fully enclose the filling. Dust the mooncake mold with cornstarch, place the ball inside, and press firmly until it won’t go down any further. Hold for at least 15 seconds, then push the lever to release the mooncake. Cover and repeat with the remaining pieces.
If the filling starts getting too soft to handle, just pop it back in the fridge for a little while before continuing.
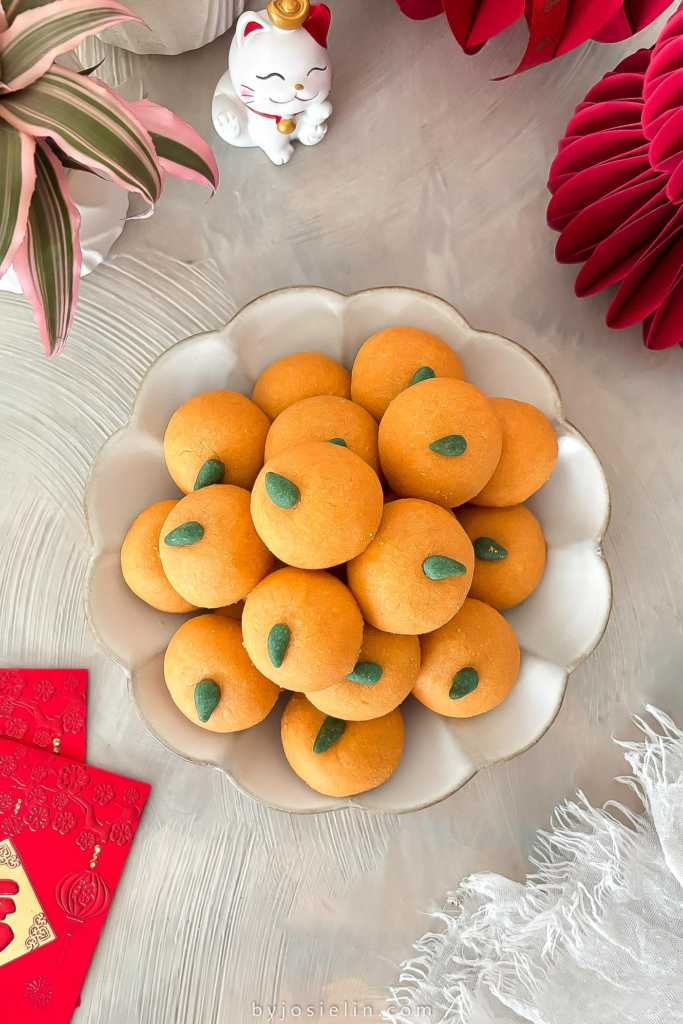
MANDARIN ORANGE COOKIES
The cutest little cookies shaped like mandarin oranges! They’re buttery and tender with a soft, melt-in-your-mouth center, infused with natural powdered orange flavor for a bright citrusy finish. Each one looks just like a tiny mandarin, complete with its vibrant color and charming shape. They’re surprisingly simple to make, but turn out so irresistibly cute and impressive. Perfect for gifting, celebrations, or just bringing a little extra joy to your dessert table.
Ingredients:
- 113g (1 stick) unsalted butter, soft at room temperature
- 90g (3/4 cup) powdered sugar
- 1 egg yolk
- 1/2 teaspoon vanilla extract
- 156g (1+1/4 cups, spoon and level method) all-purpose flour
- 48g (1/2 cup) almond flour
- 1/4 teaspoon salt
- 3 teaspoons powdered orange
- 1/2 teaspoon matcha
- gel food coloring, optional
Here’s How to Make It:
Line one baking sheet with parchment paper or a silicone baking mat and set aside. In a small bowl, whisk together the flour, almond flour, and salt. Set aside.
In a large mixing bowl, beat the unsalted butter, powdered sugar, egg yolk, and vanilla extract until smooth and creamy. Gradually add the flour mixture to the butter mixture, mixing just until a soft dough forms. Be careful not to overmix, as this can make the cookies tough. If the dough is still sticky, add more flour, one teaspoon at a time.
Turn the dough out onto a clean work surface. Divide off a small portion of the dough and knead in the matcha powder to create a green dough for the leaves. Add the powdered orange to the larger portion and knead until evenly colored and fully incorporated.
Shape the orange dough into small mandarin-sized balls (this recipe makes about 25 cookies). Gently flatten the tops slightly, then use a toothpick or skewer to create subtle indent lines. Add a small piece of the green dough on top to resemble an orange leaf. Arrange the cookies on the prepared baking sheet, spacing them slightly apart. Freeze for about 15 minutes to help them hold their shape. Meanwhile, preheat the oven to 350°F.
Bake for 16–18 minutes, or until the bottoms are lightly golden. Let the cookies cool on the baking sheet for 10 minutes before transferring them to a wire rack to cool completely.
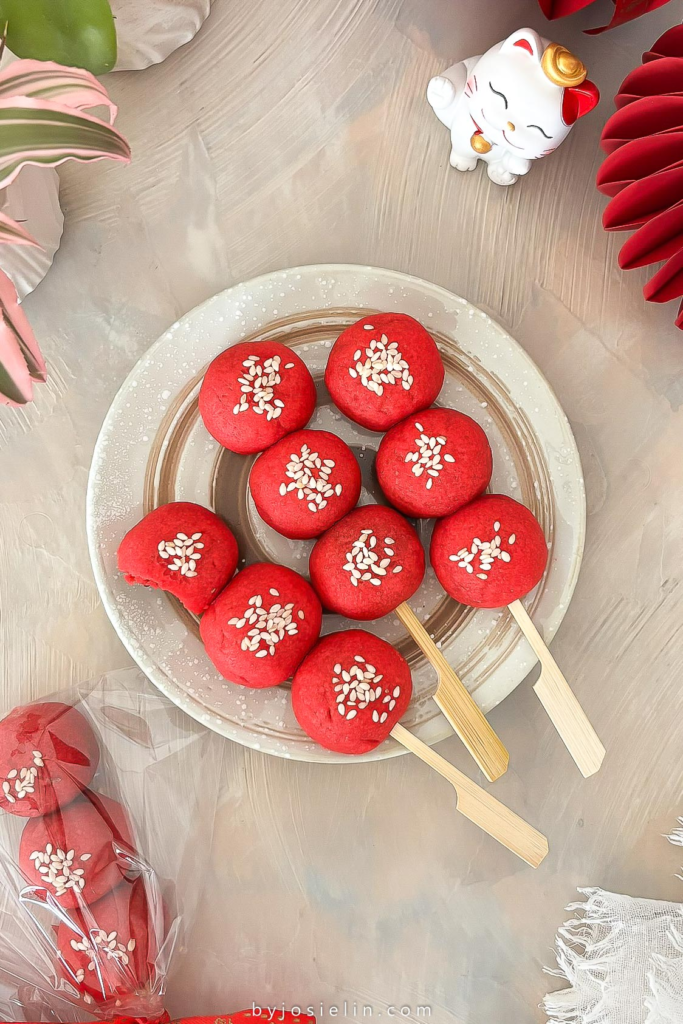
TANGHULU INSPIRED COOKIES
If you’re wondering what tanghulu is, it’s a traditional Chinese street snack made by skewering fruit, most commonly hawthorn berries on a bamboo stick and coating them in a crisp, hardened sugar syrup. These cookies are inspired by that classic tanghulu. But, since I couldn’t find fresh hawthorn berries, I used red bean paste for the filling instead.
Red Bean PaSte:
- 220g (1 cup) adzuki beans
- 100g (1/2 cup) granulated sugar
- 110g (1/2 cup) brown sugar
- 1 pinch of salt
- 2 tablespoons unsalted butter
Cookie Dough:
- 169g (1+1/2 sticks) unsalted butter, soft at room temperature
- 60g (1/2 cup) powdered sugar
- 1 egg
- 1/2 teaspoon vanilla extract
- 2 drops red gel food coloring
- 48g (1/2 cup) almond flour
- 281g (2+1/4 cups, spoon and level method) all-purpose flour
STEP 1 – Make the Red Bean Paste
Rinse the adzuki beans, then place them in a bowl and cover with water. Cover the bowl and let the beans soak overnight. The next day, drain and rinse them well.
Transfer the soaked beans to a medium saucepan and add enough water to fully cover them. Bring to a simmer and cook until the beans are very soft and easily mashable when pinched, about 2 hours. Add more water if needed during cooking to keep the beans submerged.
Drain the beans thoroughly, then transfer them to a food processor. Add the white sugar, dark brown sugar, salt, and unsalted butter. Blend on high speed until a smooth, fine paste forms, adding a small amount of water only if necessary to help it blend.
Transfer the red bean purée to a nonstick pan and cook over medium heat, stirring constantly to prevent burning. Continue cooking until the paste thickens, darkens slightly, and holds its shape when stirred. Remove from the heat and let it cool completely. Keep in mind that the paste will continue to firm up as it cools, so avoid overcooking it.
Once fully cooled, portion the paste into small balls, about 10g each, to use as the cookie filling. You’ll need about 60 balls.
STEP 2 – Make the Cookie Dough
In a small bowl, whisk together the flour, almond flour, and salt. Set aside.
In a large mixing bowl, beat the unsalted butter, powdered sugar, egg, gel food coloring
and vanilla extract until smooth and creamy. Gradually add the flour mixture to the butter mixture, mixing just until a soft dough forms. Be careful not to overmix, as this can make the cookies tough. If the dough is still sticky, add more flour, one teaspoon at a time.
Turn the dough out onto a clean work surface. Portion the dough into small balls, about 10g each. You’ll need about 60 balls.
STEP 3 – Assemble the Tanghulu Cookies
Line 2-3 baking sheets with parchment paper or a silicone baking mat and set aside.
Lightly dust a ball of cookie dough with cornstarch, then roll it out into a thin circle, about 2 inches wide. Place a red bean filling ball in the center and gently bring the edges of the dough up and around the filling, pinching to seal completely. Roll lightly between your palms to smooth the surface. Repeat with the remaining dough and filling.
Thread three cookie dough onto each skewer to resemble traditional tanghulu. Repeat until all the cookies are assembled, you should have about 20 tanghulu cookie skewers.
Arrange the cookie skewers on the prepared baking sheet, spacing them slightly apart. Freeze for about 15 minutes to help them hold their shape. Meanwhile, preheat the oven to 350°F.
Bake for about 18 minutes, or until the bottoms are lightly golden. Let the cookies cool on the baking sheet for 15 minutes before transferring them to a wire rack to cool completely.

CHINESE ALMOND COOKIES
These are the classic almond cookies you’ll often find at Chinese restaurants! My version is made with almond flour, lots of almond flour for a naturally rich, nutty flavor.
I’ve never been a fan of almond extract (it tastes a bit like medicine to me), so I set out to create a recipe without it. After plenty of trial and error, I finally landed on this recipe. Buttery with a soft center, crumbly yet slightly crisp at the edges, and full of real almond flavor. No almond extract needed!
Ingredients:
- 226g (2 sticks) unsalted buter, soft at room temperature
- 175g (3/4 cup + 2 tablespoons) granulated sugar
- 1 large egg
- 1/2 teaspoon vanilla extract
- 250g (2 cups, spoon and level method) all-purpose flour
- 96g (1 cup) almond flour
- 1/4 teaspoon salt
Here’s how to make it:
Line 2–3 baking sheets with parchment paper or silicone baking mats and set aside. In a medium bowl, whisk together the all-purpose flour, almond flour, and salt. Set aside.
In a separate large mixing bowl, beat the unsalted butter and granulated sugar until light and creamy. Add the egg and vanilla extract, then mix until smooth and fully combined. Gradually add the flour mixture to the butter mixture, mixing just until no streaks of flour remain. Do not overmix the dough.
Cover the bowl and refrigerate the dough for about 1 hour until firm. Chilling helps prevent the cookies from spreading too much and ensures crisp edges with a tender center.
Preheat the oven to 350°F. Using a medium ice cream scoop, portion the dough into about 22 balls. Gently flatten each ball into a thick disc and arrange them on the prepared baking sheets, spacing them slightly apart.
Brush the tops lightly with egg wash (1 egg mixed with 1 tablespoon milk) and press a whole almond into the center of each cookie.
Bake for about 15 minutes, or until the bottoms are lightly golden. Let the cookies cool on the baking sheets for 15 minutes before transferring them to a wire rack to cool completely.
GOLD CHOCOLATE MONEY
I spotted these adorable mini gold chocolates shaped like ancient Chinese money and couldn’t help myself, I had to buy them and add them to my platter!
ROASTED ALMONDS
After all those sweet treats with mostly soft textures, I thought a little pile of almonds would be the perfect finishing touch!
