This Chocolate Peppermint Tart is the ultimate holiday flavor combination! It’s perfect for festive gatherings or as a special treat when you need a little extra cheer. Perfectly festive and not too sweet, say hello to your new favorite Christmas dessert.
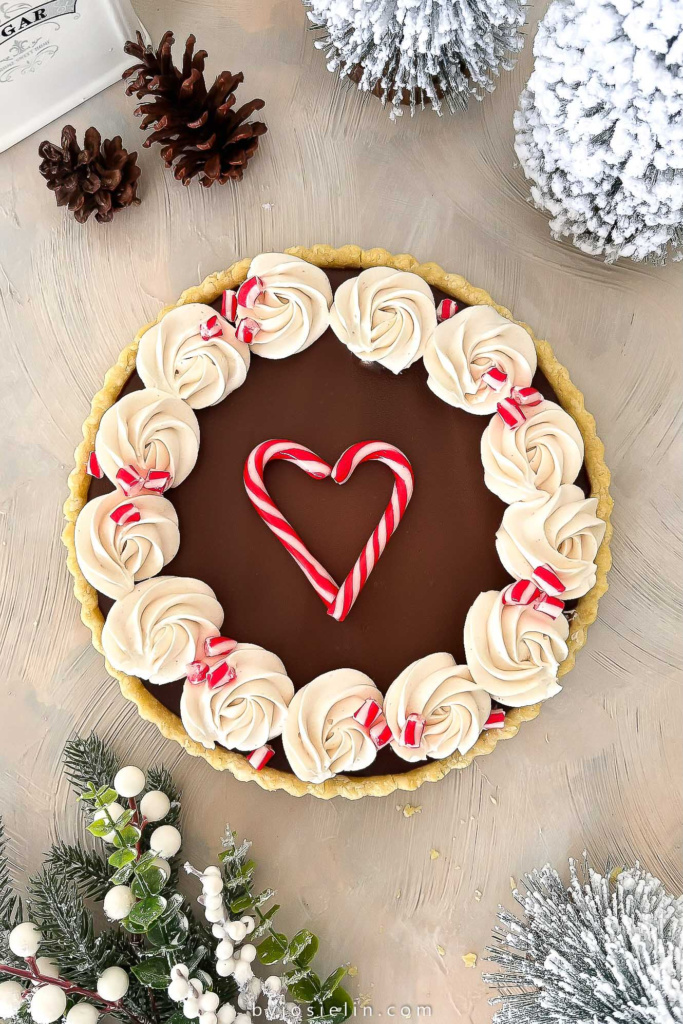
Chocolate peppermint combo is my absolute favorite holiday flavor! And this Peppermint Dark Chocolate Tart is perfectly festive and oh-so-delicious! It starts with a classic buttery sweet pastry (aka pâte sucrée) that bakes up crisp, golden, and just sturdy enough to hold all that chocolatey goodness.
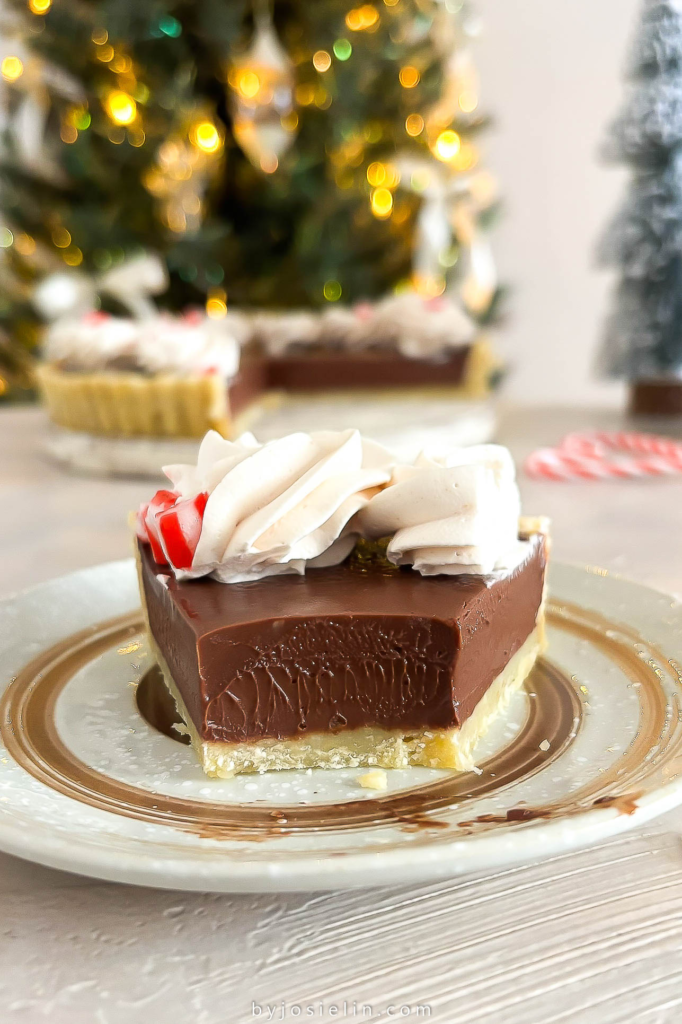
Inside, you get a silky smooth peppermint chocolate filling made with dark chocolate and a touch of peppermint extract. The peppermint extract gives it that refreshing holiday twist without overpowering the chocolates. It’s luscious, glossy, and cool without being overpowering, just that perfect hint of mint that makes each bite feel wintry and refreshing. Then it’s topped with a dark chocolate ganache that adds depth, shine, and the perfect finishing richness.
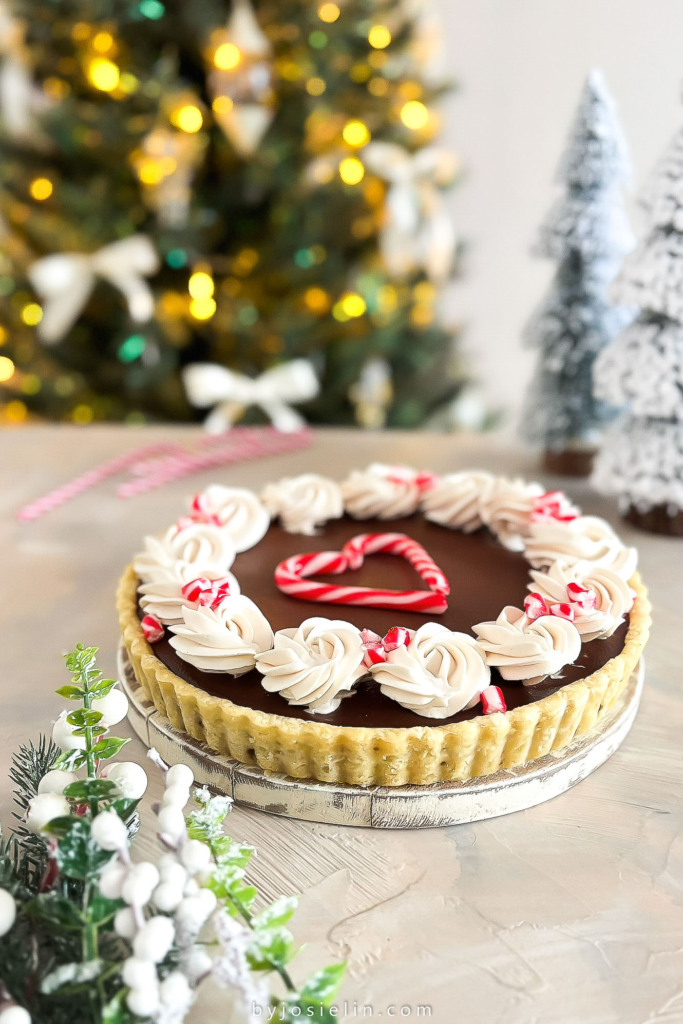
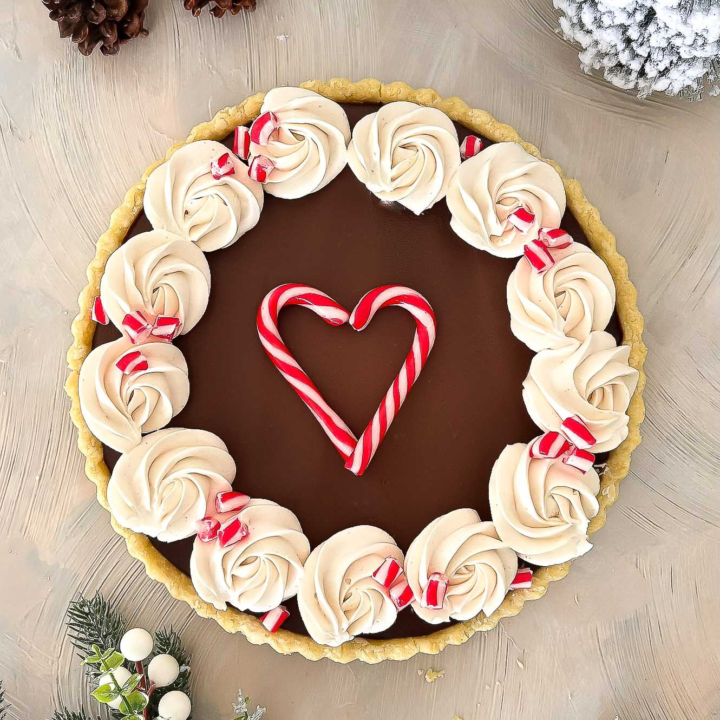
To finish it off, the tart is decorated with soft swirls of whipped cream and a sprinkle of crushed peppermint candy, adding the cutest festive touch. The pops of red and white make it look like it came straight out of a Christmas bakery window. This is the kind of dessert that not only tastes incredible but also looks adorable on your holiday table!
WHY YOU’LL LOVE THIS CHOCOLATE PEPPERMINT TART
- The perfect mix of festive and indulgent without feeling too much! I promise it’s not overly sweet because this tart is made with dark chocolate!
- The buttery pate sucree gives you that delicate, cookie-like bite.
- A silky peppermint chocolate filling topped with a glossy dark chocolate ganache!
- Every bite hits that chocolatey and minty flavor.
- Also, honestly, you can’t beat how cute and festive this tart looks!
INGREDIENTS NEEDED & NOTE TO MAKE THIS CHOCOLATE PEPPERMINT TART
Flour – No fancy flour needed, just a regular all-purpose flour!
Butter – You’ll need this to make the pastry shell and also to make the pastry cream. You can use unsalted or salted butter, both works, but I recommend using unsalted butter so you can control the salt.
Eggs – You’ll just need large 2 eggs to make this tart. Make sure they’re large eggs and at room temperature.
Heavy Cream – You’ll need heavy whipping cream with 35% – 40% milk fat.
Milk – Grab the whole milk, do not use reduced fat milk! Fat milk effects the texture and flavor of the pastry cream. Whole milk provides the best flavor, with a thick and silky texture.
Sugar – A lil bit granulated sugar it’s not too bitter.
Dark Chocolate – This is the star ingredient, so choose a good quality chocolate for a deep and decadent flavor! You’ll need dark chocolate with 50% – 60% cacao.
Peppermint Extract – Make sure you’re using peppermint extract, not peppermint syrup! Peppermint extract gives the tart a pure, strong peppermint flavor with no added sweetness.
BAKING TOOLS & EQUIPMENT YOU’LL NEED
- 9.5-inch tart pan with removable bottom
- Pie weights or rice or beans
- Mixing bowls
- Pastry cutter or food processor
- A whisk
- Rubber spatula
- Parchment paper
- holiday desserts
STEP-BY-STEP INSTRUCTIONS TO MAKE THIS CHOCOLATE PEPPERMINT TART
(Be sure to check the printable recipe card below)
Pâte Sucrée (Pastry Shell) :
250g (2 cups, spoon and level method) all-purpose flour
63g (1/2 cup) powdered sugar
1/4 teaspoon salt
170g (1 + 1/2 sticks) unsalted butter, cold
1 egg yolk
1 teaspoon vanilla bean paste
3-4 tablespoons water, cold
Peppermint Chocolate :
80g (1/3 cup) heavy cream
160g (2/3 cup) whole milk
2 tablespoons granulated sugar
200g (7oz) dark chocolate, 50%-60% cacao
1 large egg
1/4 teaspoon peppermint extract
Chocolate Ganache :
80g (1/3 cup) heavy cream
56g (2oz) dark chocolate, 50%-60% cacao
Topping :
180g (3/4 cup) heavy cream, cold
3-4 tablespoons powdered sugar
1/8 teaspoon peppermint extract
Peppermint candy cane
STEP 1 – Make the Tart Shell
Cut the cold butter into small cubes and set aside. Combine all-purpose flour, sugar, and salt together in a food processor. Process for 30 seconds to combine. Add in the cold butter and pulse until the butter is cut into the flour and you no longer see large pieces. The mixture will be clumpy, resembling a coarse meal.
Then, gradually add the egg yolk, vanilla extract, and 2 tablespoons of cold water while pulsing. Pulse the mixture until the dough comes together, forming large clumps. If the dough doesn’t come together, you can add an extra 1-2 tablespoons of cold water. Make sure the dough is not too wet. It should hold together easily in a ball form but not sticky, and If there is still some flour that hasn’t been fully incorporated, that’s okay.
Pour the dough onto your work surface, and knead the dough a few times just until it forms a smooth ball. Flatten the dough into a disc, about an inch thick, and wrap it with plastic wrap. Refrigerate it for at least 1 hour.
*** If you make this with a pastry cutter or with your fingertips.
Cut the cold butter into small cubes, and set aside. Combine all-purpose flour, sugar, and salt together in a large bowl then add the butter cubes and gently toss the butter cubes through the flour mixture until each piece is well coated. Using a pastry cutter or your fingertips, cut the butter into the flour mixture until it resembles a coarse meal (pea-sized chunks). Keep tossing the butter through the flour mixture as you work.
Whisk the egg yolk, 2 tablespoons of cold water, and vanilla extract together, then sprinkle the mixture into the flour and butter. Mix in well using a stiff spatula or your hand until the dough comes together. If the dough doesn’t come together, you can add an extra 1-2 tablespoons of cold water. Make sure the dough is not too wet. It should hold together easily in a ball form but not sticky, and If there is still some flour that hasn’t been fully incorporated, that’s ok.
Pour the dough onto your work surface, and knead the dough a few times just until it forms a smooth ball. Flatten the dough into a disc, about an inch thick, and wrap it with plastic wrap. Refrigerate it for at least 1 hour.
STEP 2 – Blind Bake the Tart Shell
Place your chilled dough on a lightly floured surface. Let the dough sit for about 10 minutes until pliable. Gently smack the dough with the rolling pin so it loosens up, then roll out the dough to a rough 12-inch circle, or about 1/6 inch (4 mm) thick. Fold the dough over the pin to lift it, then quickly ease the dough into a 9.5-inch tart pan. (If the dough break apart, thats ok!)
Use the tips of your fingers, and press the dough against the sides and bottom of the pan evenly. Trim the excess dough off the top of the pan, then poke the bottom of the tart shell with a fork. Place the tart shell into the freezer for about while you preheat the oven.
Preheat the oven to 350F. Crush parchment paper or aluminum foil, reopen it, and press it into the chilled tart shell, covering the edges. Fill the shell with pie weights, beans, or rice, then blind bake the tart shell for about 20 minutes until the crust is set and golden brown. Remove the pie weights, then continue to bake until golden brown. Remove from the oven and let it cool slightly while you make the chocolate peppermint filling. Don’t turn the oven off!
STEP 3 – Make the Peppermint Chocolate Tart Filling
In a medium saucepan combine heavy cream, whole milk, and 1 tablespoon granulated sugar. Bring to a gentle simmer over medium-low heat. Stirring occasionally for about 3 minutes, then remove from the heat.
Add the chocolate (chopped if you’re using chocolate bars), then gently stir the mixture until the chocolate is melted and the mixture is smooth. If flecks remain after stirring, return the pan to low heat for a moment to finish melting.
In a medium bowl, whisk 1 egg, peppermint extract, and 1 tablespoon of granulated sugar until foamy. Add 1/4 cup of the warm chocolate mixture into the eggs. Drizzling slowly while you keep whisking the egg mixture. Then, pour the mixture back to the saucepan and stir to combined.
Immediately pour the peppermint chocolate mixture into the warm crust. Return to the oven, bake for 5 minutes, then turn the oven off (Do not open the oven’s door). Let the tart sit in the hot oven until the filling set. It should set around the edges, but the center jiggles when gently shaken, usually about 15 minutes. Transfer the tart to a wire rack to cool completely.
STEP 4 – Make the CHOCOLATE PEPPERMINT TART
Place chopped chocolate in a heatproof bowl and set aside. In a small saucepan, bring the heavy cream to a gentle simmer until small bubbles appear around the edges. Do not boil the cream! Pour hot cream over the chocolate, cover with aluminum foil, and allow to stand for about 2 minutes. Then, whisk until smooth and shiny. (If the chocolate has not melted completely, set the bowl over a saucepan filled with simmering water. Keep stirring until the chocolate and cream are fully combined, smooth, and silky.)
Pour the chocolate ganache over the peppermint chocolate filling and use an offset spatula or a rubber spatula to spread the ganache evenly, then let the ganache cool and set. Transfer the tart to an airtight container or cover with plastic wrap and refrigerate the tart for at least 2 hours or up to 2 days before removing from the pan.
STEP 5 – Make the Peppermint Whipped Cream and Decorate
When you’re ready to serve the tart, make the peppermint whipped cream or use store-bought whipped cream to decorate the tart.
To make the peppermint whipped cream: Chill your equipment to ensure your mixing bowl and beaters are very cold.
In the cold mixing bowl, combine cold heavy cream (straight from the fridge), peppermint extract, and powdered sugar. Whip until the cream thickens and forms stiff peaks (Stiff peaks are firm and hold their shape straight up). This usually takes only a few minutes, so do not walk away.
Remove the tart from the pan and transfer to your serving plate. Decorate with whipped cream and peppermint candy cane, enjoy!
HERE’S HOW TO STORE THIS CHOCOLATE PEPPERMINT TART
Once assembled, this Peppermint Dark Chocolate Tart should be stored in an airtight container in the refrigerator for up to 4 days.
For leftovers, it’s best to cut the tart into individual slices, wrap each slice tightly in plastic wrap, and store them in an airtight container. Keep refrigerated for up to 4 days or freeze for up to 1 month.
Peppermint Chocolate Tart
Chocolate and peppermint are the essential flavor combination during the holidays, and to me, this Peppermint Dark Chocolate Tart is the holidays in a dessert! It’s perfect for holiday gatherings or just as a special indulgence when you need a little cheer. Perfectly festive and oh-so-delicious, say hello to your new favorite not-too-sweet Christmas dessert!
Ingredients
Pâte Sucrée (Pastry Shell) :
- 250g (2 cups, spoon and level method) all-purpose flour
- 63g (1/2 cup) powdered sugar
- 1/4 teaspoon salt
- 170g (1 + 1/2 sticks) unsalted butter, cold
- 1 egg yolk
- 1 teaspoon vanilla bean paste
- 3-4 tablespoons water, cold
Peppermint Chocolate :
- 80g (1/3 cup) heavy cream
- 160g (2/3 cup) whole milk
- 2 tablespoons granulated sugar
- 200g (7oz) dark chocolate, 50%-60% cacao
- 1 large egg
- 1/4 teaspoon peppermint extract
Chocolate Ganache :
- 80g (1/3 cup) heavy cream
- 56g (2oz) dark chocolate, 50%-60% cacao
Topping :
- 180g (3/4 cup) heavy cream, cold
- 3-4 tablespoons powdered sugar
- 1/8 teaspoon peppermint extract
- Peppermint candy cane
Instructions
STEP 1 – Make the Tart Shell
- Cut the cold butter into small cubes and set aside. Combine all-purpose flour, sugar, and salt together in a food processor. Process for 30 seconds to combine.
- Add in the cold butter and pulse until the butter is cut into the flour and you no longer see large pieces. The mixture will be clumpy, resembling a coarse meal.
- Gradually add the egg yolk, vanilla extract, and 2 tablespoons of cold water while pulsing. Pulse the mixture until the dough comes together, forming large clumps.
- If the dough doesn’t come together, you can add an extra 1-2 tablespoons of cold water. Make sure the dough is not too wet. It should hold together easily in a ball form but not sticky, and If there is still some flour that hasn’t been fully incorporated, that’s okay.
- Pour the dough onto your work surface, and knead the dough a few times just until it forms a smooth ball. Flatten the dough into a disc, about an inch thick, and wrap it with plastic wrap. Refrigerate it for at least 1 hour.
- *** If you make this with a pastry cutter or with your fingertips. Cut the cold butter into small cubes, and set aside. Combine all-purpose flour, sugar, and salt together in a large bowl then add the butter cubes and gently toss the butter cubes through the flour mixture until each piece is well coated. Using a pastry cutter or your fingertips, cut the butter into the flour mixture until it resembles a coarse meal (pea-sized chunks). Keep tossing the butter through the flour mixture as you work. Whisk the egg yolk, 2 tablespoons of cold water, and vanilla extract together, then sprinkle the mixture into the flour and butter. Mix in well using a stiff spatula or your hand until the dough comes together. If the dough doesn’t come together, you can add an extra 1-2 tablespoons of cold water. Make sure the dough is not too wet. It should hold together easily in a ball form but not sticky, and If there is still some flour that hasn’t been fully incorporated, that’s ok. Pour the dough onto your work surface, and knead the dough a few times just until it forms a smooth ball. Flatten the dough into a disc, about an inch thick, and wrap it with plastic wrap. Refrigerate it for at least 1 hour.
STEP 2 – Blind Bake the Tart Shell
- Place your chilled dough on a lightly floured surface. Let the dough sit for about 10 minutes until pliable.
- Gently smack the dough with the rolling pin so it loosens up, then roll out the dough to a rough 12-inch circle, or about 1/6 inch (4 mm) thick.
- Fold the dough over the pin to lift it, then quickly ease the dough into a 9.5-inch tart pan. If the dough break apart, thats ok!
- Use the tips of your fingers, and press the dough against the sides and bottom of the pan evenly. Trim the excess dough off the top of the pan, then poke the bottom of the tart shell with a fork. Place the tart shell into the freezer for about while you preheat the oven.
- Preheat the oven to 350F. Crush parchment paper or aluminum foil, reopen it, and press it into the chilled tart shell, covering the edges.
- Fill the shell with pie weights, beans, or rice, then blind bake the tart shell for about 25 minutes until the crust is set and golden brown. Remove the pie weights, then continue to bake until golden brown.
- Remove from the oven and let it cool slightly while you make the chocolate peppermint filling. Don’t turn the oven off!
STEP 3 – Make the Peppermint Dark Chocolate Tart Filling
- In a medium saucepan combine heavy cream, whole milk, and 1 tablespoon granulated sugar. Bring to a gentle simmer over medium-low heat. Stirring occasionally for about 3 minutes, then remove from the heat.
- Add the chocolate (chopped if you’re using chocolate bars), then gently stir the mixture until the chocolate is melted and the mixture is smooth. If flecks remain after stirring, return the pan to low heat for a moment to finish melting.
- In a medium bowl, whisk 1 egg, peppermint extract, and 1 tablespoon of granulated sugar until foamy. Add 1/4 cup of the warm chocolate mixture into the eggs. Drizzling slowly while you keep whisking the egg mixture. Then, pour the mixture back to the saucepan and stir to combined.
- Immediately pour the peppermint chocolate mixture into the warm crust. Return to the oven, bake for 5 minutes, then turn the oven off (Do not open the oven’s door). Let the tart sit in the hot oven until the filling set. It should set around the edges, but the center jiggles when gently shaken, usually about 15 minutes. Transfer the tart to a wire rack to cool completely.
STEP 4 – Make the Chocolate Ganache
- Place chopped chocolate in a heatproof bowl and set aside. In a small saucepan, bring the heavy cream to a gentle simmer until small bubbles appear around the edges. Do not boil the cream!
- Pour hot cream over the chocolate, cover with aluminum foil, and allow to stand for about 2 minutes. Then, whisk until smooth and shiny. (If the chocolate has not melted completely, set the bowl over a saucepan filled with simmering water.
- Keep stirring until the chocolate and cream are fully combined, smooth, and silky.)
- Pour the chocolate ganache over the peppermint chocolate filling and use an offset spatula or a rubber spatula to spread the ganache evenly, then let the ganache cool and set.
- Transfer the tart to an airtight container or cover with plastic wrap and refrigerate the tart for at least 2 hours or up to 2 days before removing from the pan.
STEP 5 – Make the Peppermint Whipped Cream and Decorate
- When you’re ready to serve the tart, make the peppermint whipped cream or use store-bought whipped cream to decorate the tart.
- To make the peppermint whipped cream: Chill your equipment to ensure your mixing bowl and beaters are very cold.
- In the cold mixing bowl, combine cold heavy cream (straight from the fridge), peppermint extract, and powdered sugar. Whip until the cream thickens and forms stiff peaks (Stiff peaks are firm and hold their shape straight up). This usually takes only a few minutes, so do not walk away.
- Remove the tart from the pan and transfer to your serving plate. Decorate with whipped cream and peppermint candy cane, enjoy!